AO Motherboard Code – Dive Into Our Comprehensive Guide!
Sometimes, motherboards encounter startup issues and display diagnostic codes on the screen. These codes are like secret messages that your motherboard sends to help you understand what’s happening inside your computer.
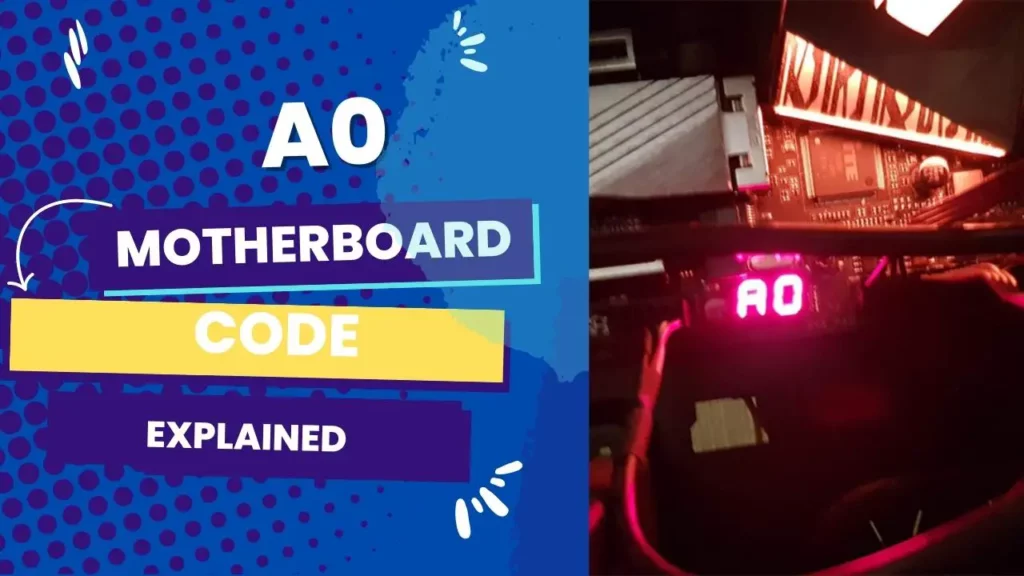
Likewise, The “AO” or “A0” motherboard code is like a thumbs-up from your computer’s motherboard. When you see this code displayed, it’s essentially saying, “Hey there, everything’s A-Okay!“
Details About the “AO” Code – Unlock the secrets!
Meaning of the “AO” Code On Motherboard:
Now that we know the “AO” or “A0” motherboard code is like a digital pat on the back. “AO” stands for “All’s Operational” or “All’s Okay.” When your computer displays this code, it assures you that all critical components have passed their checks with flying colors during the Power-On Self-Test (POST).

Purpose of Diagnostic Codes:
You might wonder, “Why does my motherboard need to tell me it’s okay?” Well, these diagnostic codes serve as a troubleshooting tool. They’re like a quick health check for your PC.
If something’s wrong during startup, your motherboard can’t send you a text message, so it relies on these codes to convey its status.
Moreover, Think of the POST as your computer’s health check-up. It examines the central parts of your system, such as the CPU, RAM, and storage drives, to ensure they’re in good working order.
When the POST completes successfully, and you see the “AO” code, it signals that your computer is stable and operational, and you can use it without worry.
Common reasons for the AO code not appearing On Your Screen – Stay Informed!
1. Hardware Connection Issues:
Loose or improperly connected components like RAM sticks, graphics cards, or power cables can disrupt the POST process.
The POST can’t communicate effectively with improperly connected hardware components. It’s like trying to converse through a bad phone line – the message gets garbled or doesn’t get through.
2. Faulty Hardware:
If a critical component, such as the CPU, RAM module, or motherboard itself, is malfunctioning, it can prevent the successful completion of the POST. If a critical component is damaged or not working correctly, it will fail to be part of the health check process.
3. BIOS/UEFI Problems:
Issues with your motherboard’s firmware, like outdated or corrupted BIOS/UEFI settings, can interfere with the boot process. It’s like giving your computer the wrong instructions, causing confusion and potential failures during the boot process.
Step-by-Step Guide for Troubleshooting the “AO” Code – Get your PC back on track!
Beginners Guide:
- Check Connections: Start by ensuring all components are securely and correctly connected to the motherboard. It includes RAM sticks, graphics cards, power cables, and data cables (like SATA cables for hard drives or SSDs).
- Reboot: Sometimes, a simple reboot can resolve temporary glitches. Try to turn off your PC and then turn it back on.
- Clear CMOS: If rebooting doesn’t work, you can reset your motherboard’s settings to default by clearing the CMOS (Complementary Metal-Oxide-Semiconductor). Refer to your motherboard’s manual for instructions on how to do this, as the process can vary.
- Check for Beep Codes: Listen for any beep codes during startup. These codes can provide additional information about the issue. Consult your motherboard manual to decipher these codes.
Experienced Users Guide:
- Inspect Hardware: Carefully inspect your hardware components for physical damage or defects. If you suspect a faulty part, try replacing it with a known working one to see if the issue is resolved.
- Update BIOS/UEFI: If your motherboard’s firmware is outdated or corrupted, updating the BIOS or UEFI can often resolve compatibility and stability issues. Download the latest firmware from the manufacturer’s website and follow their update instructions.
- Test with Minimal Hardware: To rule out hardware conflicts, try booting your system with only essential components connected – CPU, one stick of RAM, and integrated graphics (if available). Gradually add other members to identify the problematic one.
Specific Scenarios and Solutions – Don’t let Unexpected Issues Catch You off Guard!
Scenario 1 – No Display Despite “AO” Code:
If the “AO” code appears, but you still have no display, check your monitor’s cables and ensure the input source is correct. Test the monitor with another device to confirm it’s functioning.
Scenario 2 – Intermittent “AO” Code:
An intermittent “AO” code may indicate an unstable power supply. Consider testing with a different PSU to rule out power-related issues.
Scenario 3 – “AO” Code Followed by Immediate Shutdown:
This could be due to overheating. Check that your CPU cooler is properly seated and the thermal paste is applied correctly. Ensure proper airflow within your PC case.
Scenario 4 – “AO” Code After Hardware Upgrade:
Ensure all components are compatible with your motherboard after upgrading hardware. Double-check connections and compatibility, especially with RAM and GPU upgrades.
Preventing and Resolving Motherboard-Related Issues – Explore Our Guide for Expert Tips!
- Handle Components with Care: When installing or troubleshooting hardware, be gentle. Avoid excessive force, which can damage connectors, sockets, or components.
- Ground Yourself: Before touching any internal components, ground yourself by touching a metal part of the computer case. It prevents electrostatic discharge, which can harm sensitive parts.
- Read the Manuals: Consult your motherboard and component manuals for installation and troubleshooting guidance. Manufacturers provide valuable information to ensure compatibility and proper setup.
- Keep Components Cool: Adequate cooling is essential. Ensure your CPU and GPU are adequately cooled, and your PC case has proper airflow.
- Update Regularly: Periodically update your motherboard’s BIOS/UEFI firmware and drivers to maintain system stability and compatibility.
- Backup Your Data: Regularly backup important data to prevent loss in hardware issues or failures.
- Avoid Overclocking: Overclocking can strain components and potentially cause instability. Only overclock if you’re experienced and have adequate cooling.
- Clean Dust: Dust buildup can hinder cooling and lead to overheating. Clean your PC’s interior and components regularly.
Frequently Asked Questions:
1. What is error code A0 on Gigabyte?
On Gigabyte motherboards, the “A0” error code typically indicates that the system has successfully completed the Power-On Self-Test (POST) and is in a normal operational state.
2. What should I do if I don’t see the “AO” code during boot-up?
Check hardware connections, inspect for faulty components, and ensure your BIOS/UEFI settings are correct. If issues persist, consult the motherboard manual or seek professional help.
3. Can software issues trigger the “AO” code?
While software problems may cause boot-up issues, the “AO” code specifically indicates hardware functionality. Software-related problems usually manifest differently.
4. Is the “AO” code related to the motherboard brand or model?
No, the “AO” code is a universal term used across various motherboard brands and models to indicate a successful POST. However, specific codes and meanings may vary slightly.
Conclusion:
In a nutshell, “The “AO” or “A0″ motherboard code is like a friendly thumbs-up from your computer’s motherboard. When you come across this code, it means your system is running smoothly, and everything’s just fine.”
However, Regular maintenance and best practices can prevent future motherboard-related headaches.